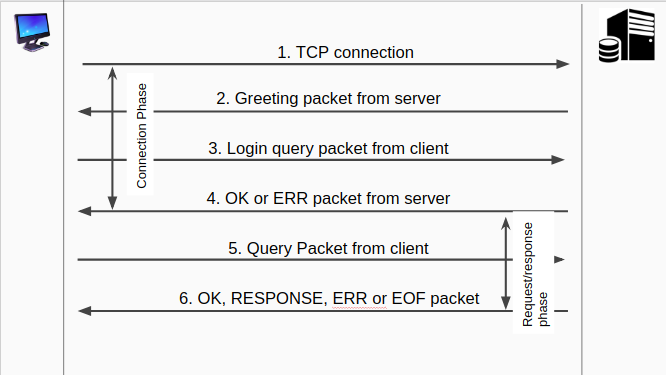
In the previous article we researched MySQL Client / Server Protocol using WireShark. Now lets start to write our codes in python to simulate MySQL native client. Ready codes are here: Github repo
First of all we have to create MYSQL_PACKAGE class. MYSQL_PACKAGE class is the parent of all other package classes (HANDSHAKE_PACKAGE, LOGIN_PACKAGE, OK_PACKAGE and etc.)
class MYSQL_PACKAGE:“””Data between client and server is exchanged in packages of max 16MByte size.”””def __init__(self, resp= b”):self.resp = respself.start =0self.end =0
def next(self, length = None, type=int, byteorder=’little’, signed=False, freeze=False):if not freeze:if length:self.end += lengthportion = self.resp[self.start:self.end]self.start =self.endelse:portion = self.resp[self.start:]self.start =self.end =0else:if length:portion = self.resp[self.start:self.start + length]else:portion = self.resp[self.start:]if type is int:return int.from_bytes(portion, byteorder=byteorder, signed=signed)elif type is str:return portion.decode(‘utf-8’)elif type is hex:return portion.hex()else:return portion
from hashlib import sha1def encrypt_password(self, salt, password):bytes1 = sha1(password.encode(“utf-8”)).digest()concat1 = salt.encode(‘utf-8’)concat2 = sha1(sha1(password.encode(“utf-8”)).digest()).digest()bytes2 = bytearray()bytes2.extend(concat1)bytes2.extend(concat2)bytes2 = sha1(bytes2).digest()hash=bytearray(x ^ y for x, y in zip(bytes1, bytes2))return hash

bytes1 = sha1(password.encode(“utf-8”)).digest()

concat1 = salt.encode(‘utf-8’)

concat2 = sha1(sha1(password.encode(“utf-8”)).digest()).digest()

bytes2 = bytearray()bytes2.extend(concat1)bytes2.extend(concat2)

bytes2 = sha1(bytes2).digest()

hash=bytearray(x ^ y for x, y in zip(bytes1, bytes2))return hash

CLASSES FOR DATATYPES
In the previous article we learned about Int and String data types of MySQL Client / Server protocol. Now we need some classes to be able to read fields from received packets.
INT CLASS
class Int:“””see documentation: https://dev.mysql.com/doc/internals/en/integer.html”””def __init__(self, package, length=-1, type=’fix’):self.package = packageself.length = lengthself.type =typedef next(self):# int<n>if self.type == ‘fix’ and self.length > 0:return self.package.next(self.length)# int<lenenc>if self.type == ‘lenenc’:byte = self.package.next(1)if byte < 0xfb:return self.package.next(1)elif byte == 0xfc:return self.package.next(2)elif byte == 0xfd:return self.package.next(3)elif byte == 0xfe:return self.package.next(8)
STR CLASS
class Str:“””see documentation: https://dev.mysql.com/doc/internals/en/string.html”””def __init__(self, package, length=-1, type=”fix”):self.package = packageself.length = lengthself.type =typedef next(self):# string<fix>if self.type == ‘fix’ and self.length > 0:return self.package.next(self.length, str)# string<lenenc>elif self.type == ‘lenenc’:length = self.package.next(1)if length == 0x00:return “”elif length == 0xfb:return “NULL”elif length == 0xff:return “undefined”return self.package.next(length, str)# string<var>elif self.type == ‘var’:length = Int(self.package, type=’lenenc’).next()return self.package.next(length, str)# string<eof>elif self.type == ‘eof’:return self.package.next(type=str)# string<null> – null terminated stringselif self.type == ‘null’:strbytes = bytearray()byte = self.package.next(1)while True:if byte == 0x00:breakelse:strbytes.append(byte)byte = self.package.next(1)return strbytes.decode(‘utf-8’)
HANDSHAKE_PACKAGE CLASS
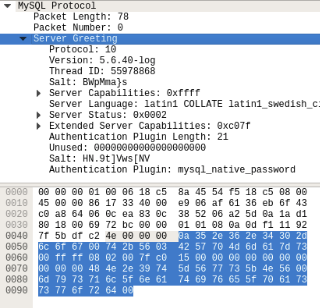
HANDSHAKE_PACKAGE class is used for parse Greeting Packet received from server. It is inherited from MYSQL_PACKAGE class and accepts resp parameter on initialization. Parameter resp is the Greeting Packet response in bytes type recieved from the server.
class HANDSHAKE_PACKAGE(MYSQL_PACKAGE):def __init__(self, resp):super().__init__(resp)def parse(self):return {“package_name”: “HANDSHAKE_PACKAGE”,“package_length”: Int(self, 3).next(), #self.next(3),“package_number”: Int(self, 1).next(), #self.next(1),“protocol”: Int(self, 1).next(), #self.next(1),“server_version”: Str(self, type=’null’).next(),“connection_id”: Int(self, 4).next(), #self.next(4),“salt1”: Str(self, type=’null’).next(),“server_capabilities”: self.get_server_capabilities(Int(self, 2).next()),“server_language”: self.get_character_set(Int(self, 1).next()),“server_status”: self.get_server_status(Int(self, 2).next()),“server_extended_capabilities”: self.get_server_extended_capabilities(Int(self, 2).next()),“authentication_plugin_length”: Int(self, 1).next(),“unused”: Int(self, 10).next(), #self.next(10, hex),“salt2”: Str(self, type=’null’).next(),“authentication_plugin”: Str(self, type=’eof’).next()}
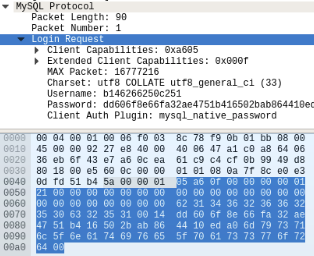
LOGIN_PACKAGE CLASS
This class is used for create Login Request packet.
class LOGIN_PACKAGE(MYSQL_PACKAGE):def __init__(self, handshake):super().__init__()self.handshake_info = handshake.parse()def create_package(self, user, password, package_number):package = bytearray()# client capabilitiespackage.extend(self.capabilities_2_bytes(self.client_capabilities))# extended client capabilitiespackage.extend(self.capabilities_2_bytes(self.extended_client_capabilities))# max package -> 16777216max_package = (16777216).to_bytes(4, byteorder=’little’)package.extend(max_package)# charset -> 33 (utf8_general_ci)package.append(33)# 23 bytes are reservedreserved = (0).to_bytes(23, byteorder=’little’)package.extend(reserved)# username (null byte end)package.extend(user.encode(‘utf-8’))package.append(0)# passwordsalt = self.handshake_info[‘salt1’] + self.handshake_info[‘salt2’]encrypted_password = self.encrypt_password(salt.strip(), password)length = len(encrypted_password)package.append(length)package.extend(encrypted_password)# authentication pluginplugin = self.handshake_info[‘authentication_plugin’].encode(‘utf-8’)package.extend(plugin)finpack = bytearray()package_length = len(package)finpack.append(package_length)finpack.extend((0).to_bytes(2, byteorder=’little’))finpack.append(package_number)finpack.extend(package)return finpack
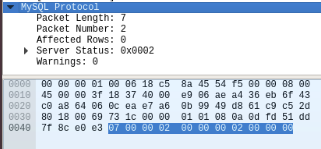
OK_PACKAGE & ERR_PACKAGE CLASSES
OK package and ERR package are the response package of server after authentication or after sending query to server on command phase.
class OK_PACKAGE(MYSQL_PACKAGE):def __init__(self, resp):super().__init__(resp)def parse(self):return {“package_name”: “OK_PACKAGE”,“package_length”: Int(self, 3).next(), #self.next(3),“package_number”: Int(self, 1).next(), #self.next(1),“header”: hex(Int(self, 1).next()),“affected_rows”: Int(self, 1).next(), #self.next(1),“last_insert_id”: Int(self, 1).next(), #self.next(1),“server_status”: self.get_server_status(Int(self, 2).next()),“warnings”: Int(self, 2).next()}
class ERR_PACKAGE(MYSQL_PACKAGE):def__init__(self, resp):super().__init__(resp)def parse(self):return {“package_name”: “ERR_PACKAGE”,“package_length”: Int(self, 3).next(), #self.next(3),“package_number”: Int(self, 1).next(), #self.next(1),“header”: hex(Int(self, 1).next()), #self.next(1, hex),“error_code”: Int(self, 2).next(), #self.next(2),“sql_state”: Str(self, 6).next(),“error_message”: Str(self, type=’eof’).next()}
MYSQL CLASS
MYSQL class is the wrapper class which creates TCP connection with server, sends and receives packages from server using above classes.
from socket import AF_INET, SOCK_STREAM, socket, gethostbynamefrom modules.packages import *class MySQL:def __init__(self, host=””, port=””, user=””, password=””):self.host = hostself.port = portself.user = userself.password = passworddef connect(self):resp = self.client.recv(65536)return HANDSHAKE_PACKAGE(resp)def login(self, handshake_package, package_number):“””Sending Authentication package”””login_package = LOGIN_PACKAGE(handshake_package)package = login_package.create_package(user=self.user, password=self.password, package_number=package_number)self.client.sendall(package)resp = self.client.recv(65536)package = self.detect_package(resp)return package.parse()[‘package_number’]def __enter__(self):self.client = socket(AF_INET, SOCK_STREAM)ip = gethostbyname(self.host)address=(ip,int(self.port))self.client.connect(address)return selfdef __exit__(self, exc_type, exc_value, traceback):print(“Good Bye!”)self.close()def close(self):self.client.close()
resp = self.client.recv(65536)return HANDSHAKE_PACKAGE(resp)